Friday, January 21

Compost cookies


You may have noticed that I haven't posted so frequently on The Culinary Vampire lately.  I haven't abandoned it nor have I lost interest. If anything, I think about it almost daily.  However, recently, I've been wrestling with the direction and focus of the blog.  I love posting recipes and all, but sometimes I'd like to share some of our personal stories and struggles.  Tara's AIP is such a focus in our daily lives and I want to share some of that with y'all. It's nice to know that other people are in the same boat as you, you know what I mean?

All that to say, while the blog will still be food-based, there will be a shift in focus and you can expect to see posts on topics like:

  • preparing meals for a mixed (AIP and non-AIP) household
  • eating right for AIP and exercising
  • losing weight with AIP (we know what a struggle that can be...)
  • more onion free and garlic free recipes
  • recipe fails (Hey, nobody's perfect and maybe you can learn from my mistakes!)
  • aaaand, delicious recipes, of course!

I hope you'll continue to read AND participate!  If there is anything you'd like to see on The Culinary Vampire, speak up! I am always open to suggestions.

On to today's recipe...


This cookie is unfortunately named the Compost cookie.  But it sounds a lot grosser than it actually is, especially when you realize that it comes from the pastry chef at Momofuku.  Essentially, you're throwing in a whole mish-mash of sweet and salty food stuffs like pretzels, chips, graham cracker crumbs, chocolate chips and dried used coffee grounds (maybe that's where the name comes from?).

The sum is definitely greater than it's parts.

It's hard to see the scale in this picture, but they're about 2.5 inches in diameter, at least.

Normally, I am very opinionated about my cookies.  I like them to be quite simple and not have too many ingredients, i.e. chocolate chip, oatmeal raisin (sans offending chocolate chips), peanut butter, etc.  But, I've seen these cookies around the food blogosphere and they're always described as Amazing and DeeeliciousMind-blowing and - well, you get the idea.  Since I can't get up to Milk Bar just yet, I decided I had to make them at home.

I even saved the ends of my pretzel bags (who wants to eat those crumbs anyway) so I could use them for these cookies.


Christina Tosi's Momofuku Milk Bar Compost Cookies
Adapted from rainy day gal, who adapted it from Live with Regis and Kelly

Yield: 15 6oz cookies

I changed the ingredients based on what I had on hand.  Specifically, I left out the dried coffee grounds and butterscotch chips and I added Cocoa Pebbles (what?) and chocolate chunks with the chocolate chips (Enjoy Life is soy-free); also, instead of potato chips, I used tortilla chips. I actually had some graham cracker crumbs, but you could also crumble up some graham crackers in the food processor (soy-free versions are Back to Nature Honey Graham Sticks and Annie's Homemade Cinnamon Bunny Grahams).  Finally, if you're corn syrup averse or don't want to go buy a an entire container for just 1 tablespoon, you could leave that out or substitue honey (not sure how that would work, though). 

A stand mixer is definitely recommended for this recipe.  I'm sure you could use a hand mixer, but make sure it's strong enough to handle the mixing required.  I would NOT recommend making this by hand!

Ingredients

  • 1 cup Butter
  • 1 cup Sugar
  • 3/4 cup Light Brown Sugar
  • 1 Tbsp Corn Syrup (I used light)
  • 1 tsp Vanilla Extract
  • 2 Large Eggs
  • 1 3/4 cups AP Flour
  • 2 tsp Baking Powder
  • 1 tsp Baking Soda
  • 2 tsp Kosher Salt
  • 1 1/2 cups chocolate chips mixed with Cocoa Pebbles or butterscotch chips
  • 1 1/2 cups crushed potato chips and pretzel crisps
  • 1/2 cup graham cracker crumbs
  • 2 tablespoons dried used coffee grounds
  • 1/2 cup oats
Directions

In a stand mixer with the paddle attachment, cream butter, sugars, coffee grounds, and corn syrup on medium high for 2-3 minutes until fluffy and pale yellow in color. Scrape down the sides of the bowl.

On a lower speed, add eggs and vanilla to incorporate. Increase mixing speed to medium-high and start a timer for 10 minutes. During this time the sugar granules will fully dissolve, the mixture will become an almost pale white color and your creamed mixture will double in size. 

When time is up, on a lower speed, add the flour, baking powder, baking soda, and salt. Mix 45-60 sec just until your dough comes together and all remnants of dry ingredients have incorporated.  Be careful not to over mix the dough. Scrape down the sides of the bowl again.

On same low speed, add in the chocolate chip mixture (butterscotch chips and/or cereal, too), graham cracker crumbs, and oats and mix for 30-45 sec until they evenly mix into the dough. Add in the chips and pretzels last, mixing on low speed again until they are just incorporated.

Using a 6oz ice cream scoop, portion cookie dough onto a parchment lined cookie sheet. (I don't have a 6oz ice cream or cookie scoop, so I just winged it by looking at rainy day gal's and Amateur Gourmet's pictures.) 

Wrap scooped cookie dough tightly with plastic wrap and refrigerate for a minimum of 1 hour or up to 1 week.  Do NOT BAKE your cookies from room temperature or they will not hold their shape.

Heat your oven to 400F.  Just before the oven is ready, arrange your chilled cookie dough balls on a parchment-lined cookie sheet a minimum of 4″ apart in any direction. (Trust me on this, they spread.)  Bake 9-11 min. While in the oven, the cookies will puff, crackle and spread.  At 9 min the cookies should be browned on the edges and just beginning to brown towards the center.  Leave the cookies in the oven for the additional minutes if these colors don’t match up and your cookies stills seem pale and doughy on the surface.
Cool the cookies completely on the sheet pan.  Transferring to an airtight container and store.  At room temp, cookies will keep fresh 5 days. In the freezer, cookies will keep fresh 1 month.


Verdict and notes:

Tara and the rest of the softball team loved these.  I was just OK with them.  I wouldn't go through the trouble making them for personal consumption as I felt they were only marginally better than a good chocolate chip cookie.  I did, however, like the salty-sweet combo, so I might consider adding some chips or pretzels to my next batch of chocolate chip cookies.
 

Thursday, December 30

Cranberry sorbet


I made this cranberry sorbet as part of my annual ice cream birthday party.  I've done it for a few years now and I always like to use different recipes for the social.  After I had all my ice cream recipes gathered (oreo cheesecake, lemon curd, Irish Car Bomb with Guinness ice cream and a Bailey's Irish Creme swirl, honey vanilla coconut, basil, dulce de leche, and sweet cream), I realized that all the flavors were heavy and cream-based and there wasn't anything light and fruity.  After a quick search, I settled on the season-appropriate cranberry sorbet


I've made sorbet before and it froze rock-hard, even with alcohol. For this cranberry sorbet, I waited to churn it until shortly before the party.  I needn't have worried, though. I've had it in my freezer for 2 weeks now, there is nary an icy chunk to be found, and it's still as good as when I first made it. We can thank the Grand Marnier for that; there's just enough to keep it soft and enhance, without overwhelming, the cranberry.


This sorbet exceeded my expectations! It was tart and sweet and it was fairly creamy (as far as sorbets go). One of my guests had the brilliant idea of pairing it with the lemon curd ice cream and it was super yummy!


Cranberry season may be winding down, but there is still plenty of time to make this sorbet, so hop to it!


Cranberry Sorbet
Barely adapted from UseRealButter who, in turn, adapted it from David Lebovitz.

The liqueur is optional, but highly recommended.  The flavors really work together but, more importantly, it keeps the sorbet scoopable directly from the freezer.  If you nix the liqueur, you'll need to let the sorbet stand at room temperature for about 10 minutes before scooping.  Also, if you don't have any Grand Marnier, I bet you could substitute vodka, but go easy on it. 

Makes about 1 quart.

Ingredients

  • 1 1/2 cups cranberries, fresh or frozen
  • 1 cup water
  • 3/4 cup sugar
  • 1 1/2 cups cranberry-raspberry juice
  • 2-3 teaspoons Grand Marnier (optional)

Directions

Heat cranberries, water, and sugar in a medium saucepan until liquid begins to boil. Let boil for 1 minute then remove from heat and cover. Let stand for about 30 minutes. Purée the cranberries and their liquid in a blender or food processor then press through a sieve to remove the cranberry skins and seeds. (conversely, you could use a food mill fitted with a fine disk). Stir in the juice and the liqueur. Chill the mixture thoroughly, then freeze it in your ice cream maker according to the manufacturer’s instructions.

Monday, November 29

Cashew butter cookies


Now that Thanksgiving is over, we can focus on Christmas! Here are those cashew butter cookies I promised in the oh-so-Thanksgiving-appropriate cashew nut butter post.

Just like the Key West lime coconut butter cookies, these cookies were a result of another nut-butter fail.  I don't think I mentioned it in the cashew nut butter post, but my cashew butter was extremely dry and thick.  It was barely spreadable.  I worked with it as long as I could, but after that, I knew some cookies were in order.  

(L) Cashew butter, (R) Coconut butter

I actually made these the same day as the coconut butter cookies and it was a toss up as to which ones Tara and I liked better.  These cashew butter cookies were a little softer, richer, and more like peanut butter cookies.

Regardless, if you normally make peanut butter cookies for your cookie exchange, consider these cashew butter cookies instead.  Or, better yet, make both - 'Tis the season for giving!


Honey cashew butter cookies
Adapted from Better Homes and Gardens New Cookbook, 75th year anniversary

This is another riff off the classic peanut butter cookie recipe.  The only thing I changed, aside from using cashew butter, was subbing in 1/4 cup honey for the brown sugar.

Ingredients
  • 1/2 cup butter
  • 1/2 cup cashew butter
  • 1/2 cup granulated sugar
  • 1/4 cup honey
  • 1/2 teaspoon baking soda
  • 1/2 teaspoon baking powder
  • 1 egg
  • 1 teaspoon vanilla extract
  • 1 1/4 cups all-purpose flour
  • Granulated sugar

Directions

Preheat oven to 375F.  In a large mixing bowl beat butter and cashew butter with an electric mixer on medium to high speed for 30 seconds. Add the granulated sugar, honey, baking soda, and baking powder. Beat until combined, scraping sides of bowl occasionally. Beat in egg and lime until combined . Beat in the flour, stirring if necessary. If the dough is difficult to handle, cover and chill for about 30 minutes.

Shape dough into 1-inch balls. Roll in additional granulated sugar to coat. Place 2 inches apart on an ungreased cookie sheet. Flatten by making crisscross marks with the tines of a fork. Bake for 9 to 13 minutes (less for softer cookies) or until bottoms are lightly browned. Transfer to a wrack and let cool.

Wednesday, November 24

Cashew nut butter

I realize that tomorrow is Thanksgiving and I should probably post a more appropriate recipe, but this is what I have ready, so this is what you get!  There are a few Fall/Thanksgiving appropriate dishes on the blog that you can check out if you need some last minute inspiration, though.


I enjoy making my own nut butter flavors at home.  They're relatively easy and you can experiment with any number of nut/flavor combinations you can think of. I'm still experimenting with flavors, but so far, I've made plain pumpkin seed butter (can't wait to try this with some cinnamon, nutmeg, or ginger or all 3), maple cinnamon pecan butter (OMG, to die for, recipe coming soon), and this cashew butter.   


Nut butters can be used in the same way that you would use peanut butter: sandwiches, cookies (recipe coming up for cashew butter cookies), granola, smoothies, etc.

For the sandwiches below, I made a "Peanut butter & jelly" sandwich, but with the cashew butter and lingonberry preserves (cranberry sauce would work well, too). I gotta say, it was a pretty outstanding sandwich as far as PB&J goes.


Cashew nut butter

This is more of a concept than a hard and fast recipe; you can scale this up or down and add as little or as much flavorings as desired.  I prefer to roast my own nuts so I can add any liquids before roasting and allow for caramelization.  However, you can use already roasted nuts and add your liquids in the processor; just use a little bit less.  Also, if you don't want to add the honey, you shouldn't need to add any oil; for some reason the honey clumps up the cashew butter.

Ingredients

  • 16oz (1 pound) cashews
  • 2-3 Tablespoons honey, or to taste
  • ~1 teaspoon salt
  •  5 teaspoons oil (I used a combo of grapeseed and coconut)

Directions

Preheat oven to 350F.

Coat cashews with honey (and any other flavorings).  Roast for 8-10 minutes, stirring occasionally,  until they're a light golden brown; keep an eye on them because under done is better than over done in this case! 

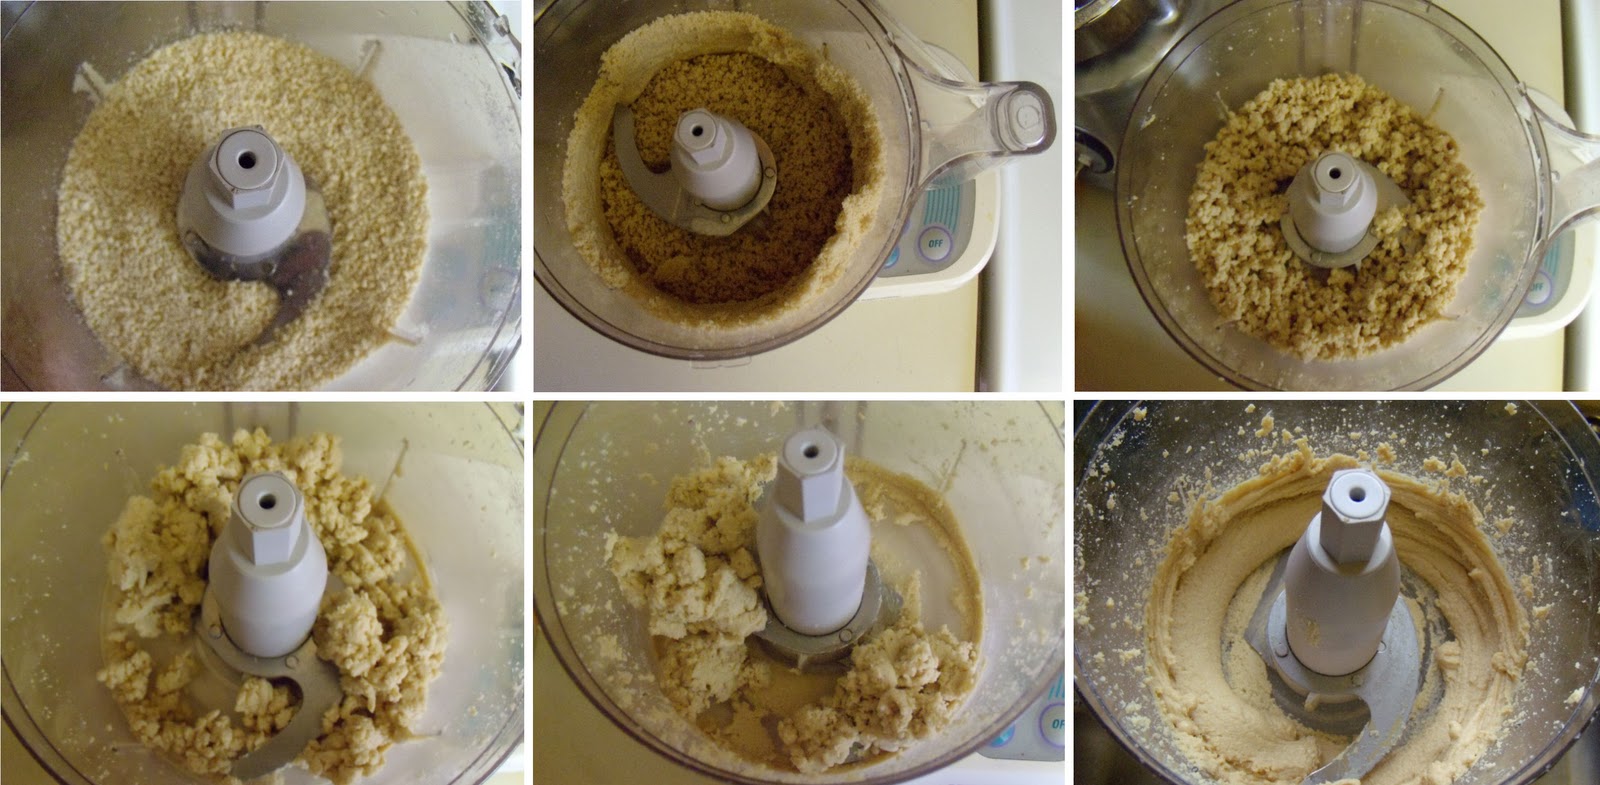
Place nuts in food process and process until the texture doesn't change anymore, stopping regularly to scrape down the bowl.  The nuts will go through several stages (check out the above pic) and it might take awhile - 15 minutes or so. Add the salt and slowly pour in the oil.  Process until you get a fairly smooth consistency.

I store my nut butters in old glass peanut butter jars.  They'll be fine out of the fridge for a few months, but if you're unsure, you can store them in the fridge.

  
Related Posts Plugin for WordPress, Blogger...