Thursday, September 30

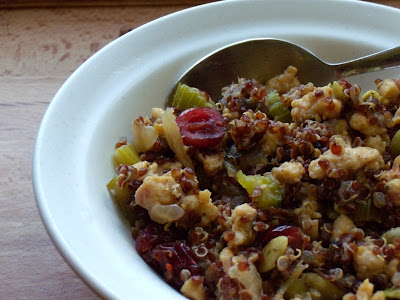
Quinoa and sausage stuffed acorn squash


Woohoo!  It's Fall!!  Around here, Fall is more of an attitude than an actual season because significantly cooler temperatures don't arrive here until November.  Normally, I'm not so excited about Fall, but this year, I've already put some mini pumpkins on display and I've started transitioning from lighter summer recipes  to the heartier fall recipes.  This past weekend, I had a marathon session in my kitchen where, among other things, I roasted butternut squash and a pumpkin and made this very fall-inspired dish.


I actually attempted this dish once before, but it did not turn out very well at all.  I chalk it up more to user-error than anything else: I over-peppered and underseasoned at the same time, I tried to make it vegetarian while missing some of the key ingredients like celery and fresh herbs, and I used a butternut squash as the base, which made it squash heavy.  I'd like to try vegetarian-izing it again, but, honestly, this version is so darn good, I'm not sure that I need to.  


This recipe makes a lot of stuffing - probably enough for 8 servings - especially since I upped the quinoa amount.  So, either scale down the recipe or save the stuffing for leftovers.  I've already had the stuffing heated up plain, wrapped in a burrito with scrambled eggs, and microwaved with an egg mixed in and topped with salsa (most successful version, IMO).   You could also put it in a small baking dish and top it with the cheese Panko mixture.  I plan on doing this next time because I'm not sure how much the acorn squash adds to the flavor.


Quinoa and sausage stuffed acorn squash
Adapted from The Other Side of Fifty

Squash:
  • 1 acorn or other small squash (mini pumpkins might work well, too)

Cut squash in half and remove seeds and any stringy pulp. Brush squash halves with olive oil and season with salt and pepper. Place squash halves, cut side up, on a baking sheet and add 1/4" of water to pan. Roast squash in 375 degree oven for 45-50 minutes, or until fork tender.

Quinoa:
I used red quinoa from the bulk bin at Whole Foods.  If you buy your quinoa in bulk, use the directions below, otherwise follow the directions on the package.  Also, I doubled this recipe, not realizing just how much it made.

  • 1/2 cup quinoa, rinsed thoroughly
  • 3/4 cup vegetable or chicken broth (I used homemade mushroom broth)

Bring the broth to a boil in a medium saucepan; pour in the quinoa and bring back to a boil.  Reduce heat to low, cover and simmer for 15-20 minutes, or until the liquid is absorbed.

Sausage stuffing:

  • 1 cup cooked quinoa
  • 1/2 cup dried cranberries, no sulfur added
  • 1/2 lb. chicken sausage (I used 2 1/2 links, casings removed)
  • 1 TBSP olive oil (or cooking fat from sausage)
  • 1/2 onion, diced
  • 1 stalk celery, diced
  • 1 clove garlic, minced
  • salt and pepper
  • 1 TBSP all-purpose flour
  • 1/2 cup vegetable or chicken broth
  • 2 tsp fresh sage, chopped
  • 1 tsp fresh rosemary, chopped (you could also use thyme)
  • 1/4 cup pumpkin or sunflower seed kernels (I used pumpkin seeds)
  • 1/4 cup Panko breadcrumbs
  • 2 TBSP parmesan cheese,grated

Brown sausage in large skillet. Remove from pan, leaving the cooking fat in the pan if you are using it, and set aside.

Return skillet to stove and add olive oil (if using). Add onion and celery and season with salt and pepper. Saute until onion is softened and translucent then add the garlic and saute for another minute or two. Sprinkle the flour over the vegetables and cook for a few minutes to ensure that flour loses its raw taste. Whisk in the broth and cook/stir until smooth and bubbly. Stir in fresh herbs and remove pan from heat. Add the pumpkin or sunflower seeds, quinoa, cranberries, and sausage to the skillet, stirring to combine well.

Stir Panko and parmesan together in a small bowl.

Stuff each half of the acorn squash with the sausage/quinoa mixture. Sprinkle the tops with the Panko crumbs. Place squash back into oven for 10-15 minutes to heat through and brown the breadcrumbs.

Monday, September 27

Review: Enjoy Life Very Berry bar

When Tara and I started to get serious about her diet and the carbohydrate requirements associated with AIP, we realized that Tara was skipping the most important meal of the day - breakfast.  Of course, eating breakfast is important for everyone, but it's doubly important for those living with AIP.  People with AIP should eat regularly and not fast, so eating breakfast (break fast) is crucial.  Well, in effect, Tara was fasting for 12+ hours in between dinner and her next meal.  The problem, though, is that she's one of those people who gets nauseous if they eat too soon after waking.  So we had to find portable breakfast items that she wanted to eat while driving to work.  Initially, we tried rice cakes, but we had to nix those as soon as she got her braces.  We had some success with a variety of snack bars (Kashi was pretty popular)...until we started eliminating foods that contraindicate AIP.

Enjoy life Very berry

Enter the company Enjoy Life. Their mission is "to make great-tasting allergy-friendly and gluten-free foods that nearly everyone can eat freely without worry." (source)  All of their foods are free of the Big 8 allergens; they are also made without casein, potato, sesame, and sulfites (big bonus for folks with AIP).  Check out their website to see all the allergen friendly goodies they have.  I can't wait to try their trail mixes.  Also, I've purchased and tasted their soy free chocolate chips (tastes just like the "real" stuff) but I have yet to use them in baking to see how they hold up.  These are the only chocolate products I have seen that do not have soy!

I first found these all the way on the bottom shelf at Whole Foods after desperately searching every single breakfast bar variety in the section.  I have since seen the Cocoa loco variety at both Publix and Walmart.  In addition to the Very Berry and Cocoa Loco flavors, they also have Caramel Apple and Sunbutter crunch. So far, we've only tried the Very Berry.  Tara thinks they are a rather bland and dry, especially when compared to regular breakfast bars.  I'll agree that they're a little dry, but I rarely eat breakfast bars and I find these to be plenty sweet.  Plus, I enjoy the crunch of the rice flakes.  I probably won't buy them regularly, but that's because I really have no need to - I eat cereal or oatmeal every morning.  If my needs suddenly changed, I would definitely buy these, though!

Do y'all have any recommendations for breakfast-y type foods that are AIP-friendly?

Friday, September 24

Shrimp and mushroom couscous


I've been making some serious headway into cleaning out the "pantry."  The only problem is that Tara keeps requesting new stuff to eat!  Poor girl!  She normally gets bored of foods pretty quickly and, now that she's limited to liquid and super soft foods on top of the restrictions for Porphyria, she's been trying anything possible to vary up her diet.  We have almost every variety of soup available at the local stores - but all that has done is reinforce why we're not soup people...  It's been interesting - and a little frustrating, truth be told - but we're making do.  On the plus side, she's lost a good amount of weight (~15 pounds as of last weigh in), but due to her curbed activity level, she hasn't had any AIP symptoms!  We're hoping to use this as a jump start to further weight loss when she gets better.  I'll definitely keep y'all posted as that is generally not an easy thing to do with Porphs.


In any event, this meal was a total pantry cleaner.  I used some shrimp that was in the freezer for a while, a white/whole wheat couscous mix purchased from the bulk bins at Whole Foods, and some homemade mushroom stock for the liquid.  While I love the simplicity of the flavors, it might be a little bland for some.  Feel free to play around with seasonings or fresh herbs to up the flavor profile.


Shrimp and mushroom couscous
Serves 4

I like my mushrooms on the crispy side so I sauteed them separately, but you could just as easily cook them together and only dirty one pot.  I'll give directions for both methods.  Also, Tara and I like to have quite a few shrimp per serving, so adjust accordingly for your needs.

Ingredients
  • 1 cup whole wheat and/or white couscous
  • 1 1/2 cups of vegetable stock or water
  • 8 oz (or more) mushrooms, sliced
  • 1 1/2 tablespoons butter
  • 2 1/2 tablespoons extra virgin olive oil, divided
  • 1 pound large shrimp, peeled
  • 1 teaspoons freshly squeezed lemon juice, or to taste, optional
  • Salt and pepper to taste 
  • Optional: skewers, soaked in water for 30 minutes
Directions

Heat the broiler (or toaster oven) until hot and put the rack as close to the heat source as possible.

Cooking the mushrooms and couscous separately:

Heat a large skillet over med - med/high heat.  Once the pan is hot, add 1 1/2 tablespoons of the oil.  After the oil has heated, add the butter and cook until it has foamed. Add the mushrooms, stir to coat, and season with salt and pepper.  Saute the mushrooms in the butter-oil mixture until they are slightly crispy, about 10-15 minutes.

While the saute pan is heating, bring the vegetable stock to boil in a medium pot.  After the liquid has boiled, pour in the couscous, cover and turn off the heat.  Let white couscous stand for 5 minutes, whole wheat for 10.  Fluff with a fork before serving.

Cooking the mushrooms and couscous together:

Follow the directions for sauteing the mushrooms above.  Put the couscous in the pan, stirring to coat with the oil and begins to toast, 3 to 5 minutes.  Add the broth and bring to a boil, then cover and turn off the heat.  Let stand for 15 minutes.  Fluff with a fork before serving. 

After you've started both the mushrooms and couscous, coat the shrimp with the remaining 1 tablespoon of olive oil and season with salt and pepper.  Broil the shrimp, turning once, for 2 to 3 minutes per side.  (As you can see from the pictures, I used skewers for this.  They're not required, but it makes turning a little easier.) (Also, if you look at the pictures, you'll see a sort of coating on the shrimp; I was experimenting with some ground pepitas/pumpkin seeds.  It didn't work very well, which is why I didn't include it in the recipe.  If you do want to add some crunch, include roasted pumpkin seeds just towards the end of the cooking.)

To serve, mix the mushrooms and couscous together and top with the shrimp.

Tuesday, September 14

Pasta with mushrooms and 'homemade' sauce


While Tara is recovering from her jaw surgery, I can pretty much eat what I want.  Naturally, there will be some meals consisting solely of popcorn or avocado toast, but I also want to take the opportunity to eat down some of the food that's been languishing in the kitchen.  You know what I'm talking about - all that stuff that was bought with good intentions (Oooh, look!  Homemade falafels; I can totally do that!*) - but for whatever reason, they weren't used.  I'm actually looking forward to cooking up some of that food, especially the items that I like but Tara won't eat: Helloooooo angel hair pasta!

I came up with this meal on the fly.  There were several things in the fridge and freezer that I wanted to use up:  fresh mushrooms, frozen diced onion, ravioli, mystery grated cheese (Parmesan?), and a half-empty (full?) container of Ragu pasta sauce.  Pasta it was!  However, I took one taste of the sauce and dumped it down the drain; I don't know if it was just stale or too sweet, but it was nasty!  So, I had to resort to canned tomatoes for a sauce and, thankfully, it was pretty good.  I found the sauce to be a little salty, but Tara declared it the best pasta sauce she ever had.  She even insisted on having a small bowl with noodles chopped up super small.


Pasta with mushrooms and 'homemade' sauce 

The sauce makes 4-6 servings, depending on how saucy you like your pasta. 

Your best bet to get the pasta, sauce, and mushrooms done at the same time is to start them around the same time - Shocking, I know!  So, as soon as you put the water on to boil, turn the heat on for the oil, then puree the tomatoes and get them heating in the pot, and finally, start cooking the onions.   If you time it right, you could potentially have this meal ready in 20-25 minutes.

Ingredients 
  • 1 14.5 oz can stewed tomatoes, Italian recipe
  • 1 14.5oz can diced tomatoes, Basil, Garlic, and Oregano flavor
  • 1/4 yellow or white onion, diced
  • 8oz button or cremini mushrooms, sliced
  • 1 heaping Tb butter
  • 2 heaping Tb oil, divided (grapeseed or olive oil are good) 
  • pasta of your choice
  • Parmesan cheese for topping, optional
Directions

Bring a large pot of salted water to boil.  Dump in the pasta, boil for a minute or so and turn off the heat, add 1 tablespoon of the oil, and cover.  Let sit for 10 minutes, stirring occasionally, or until the pasta is cooked to your liking.  Check the pasta frequently after the 10 minute mark to determine when the pasta is done.  I find this method a lot easier to cook pasta than the traditional method. Once the pasta is done, drain and return to the pot.

Puree the tomatoes to your preferred consistency using a food processor, blender, or immersion blender; I only did a few pulses because I like my sauce chunky.  In an uncovered sauce pot, bring the puree to a boil and then reduce heat to an easy simmer.

While the sauce is cooking and you're waiting for the pasta water to boil, heat a large skillet over med - med/high heat.  Once the pan is hot, add the oil.  After the oil has heated, add the butter and cook until it has foamed.  Add the onions and stir to coat in the butter-oil mixture; turn down the heat down to medium.  Cook the onions, stirring frequently, until they have browned, about 5 minutes - Be careful not to burn them!  Finally, add the sliced mushrooms, stirring to coat; you may need to add some more butter or oil at this point.  Saute the mushroom-onion mixture until they are done to your liking, 10-15 minutes.

To serve, plate the noodles, top with sauce and mushrooms.  Sprinkle with Parmesan, if using.

* When Tara read that sentence, she said, "I want homemade falafels!"

Thursday, September 9

Fig, goat cheese, and prosciutto pita sandwich


My local grocery store had figs buy-one-get-one free (BOGO) and I was so excited that I gave a little "Woohoo!" in the store when I saw the set-up.  Now, I've never had figs, so I had no idea what I was going to do with 2 pounds of figs, but - never fear - Tastespotting is here!  After perusing several pages of fig recipes, I've discovered that figs and goat cheese is a classic combination.  Since I was eating figs for the first time, I wanted to at least stick with something that was tried and true.  As soon as I saw the Awesome Figgy Sandwich that The Noshery posted, I knew exactly what I was going to use the figs for; it, too, was another one of those "MUST MAKE NOW" recipes.

I gotta say, I wasn't all that enamored with the figs.  I figure that's because I bought them from the store and didn't try them fresh (because everything is better fresh, of course).  They tasted a bit flower-y to me and, on their own, they were really so-so.  Plus, the texture was weird.  However, when mixed with goat cheese and tart-sweet mango butter, the combination of all the flavors was quite tasty!  Tara and I both kept saying how good the sandwich was as we were eating it.

I don't know if I'd do a BOGO of figs again, but I would definitely do a repeat of this combination!


Fig, goat cheese, and prosciutto pita sandwich
Inspired by The Noshery

I used pita bread because that's what I had; you could also use focaccia, ciabatta, or italian bread.  Additionally, I would have liked some sort of drizzle on the sandwich like the original recipe, but since we're avoiding vinegars, I had to make do with the mango butter.  Next time, I'd use either more mango butter or reduce some pomegranate juice (which I didn't have) to make a syrup.

I served this plate of deliciousness as the main dish with the cantaloupe, blueberry salad I posted recently. 

Ingredients

  • 1-2 large shallots, thinly sliced
  • 1/2 tablespoon olive oil
  • 1/2 tablespoon butter
  • 2-3 figs, sliced (I used black turkey)
  • goat cheese
  • mango butter (or some other type of sweet-tart jelly/jam/spread)
  • 2 slices prosciutto
  • 6 basil leaves
  • pita pocket, sliced in half (I recommend Toufayan)
Directions

Heat a large skillet over med - med/high heat.  Once the pan is hot, add the olive oil. After the oil has heated, add the butter.  Once the butter has melted and foamed, add the onions and stir to coat in the butter-oil mixture; turn down the heat to medium.  Cook the onions, stirring frequently, until they have browned, about 5 minutes - Be careful not to burn them!  Turn the heat down to medium or lower and continue cooking until the onions are done to your liking - I ended up with crispy (but not burnt) onions after about 30 minutes.

Assemble your sandwich as you see fit, but here's what I recommend: For each half, spread the goat cheese on one side of the pita - Don't skimp on this.  Spread the mango butter (or substitute) on the other side.  Place one slice of prosciutto along one side (either, really).  Then, add the figs and the basil leaves.  Finally, top it off with the onions.  This will be a little messy and you'll get filling all over your fingers when pushing the ingredients in, but at least it tastes good! (You'll see in the picture that I didn't use this method, but after assembly, I decided that what I recommended would make a more efficient preparation.)

Tip: To make it easier to open the pita half, heat it in the microwave for a few seconds or bake it in the oven at 350F for about 5 minutes

Tuesday, September 7

September grocery "exercise"

It occurred to me recently that I don't know how much money I spend on groceries for us; I think it might be well over $100 (maybe even $150) per week.  Couple this with the fact that I throw away an excessive amount of food and I'm sure I spend way too much on food.  This bugs me to no end, so I've decided to do something about it.

Photo courtesy of Flikr user Dan4th.

For September, I am going to save all of our grocery store receipts.  This is a fact-finding exercise and, as such, my intent is not to change my spending habits while doing it.  At the end of the month, I plan to categorize and tally up the receipts to see what I'm spending our money on.  [I'm not sure how accurate it will be because Tara's having jaw surgery soon and she won't be eating normally (and I'll be eating from the cupboards), but it'll be a start.  I may continue the exercise into October, if need be.]  


Photo courtesy of Flickr user ben_onthemove.

After I've done the receipt exercise, I need to figure out how to stop throwing away so much food.  Easier said than done, of course, but I think I probably buy too much with good intentions of using it up, but end up letting it go bad.  I already know that I should be planning out our meals and shopping instead of just going to the store and finding interesting stuff to buy.  Hopefully, after evaluating my spending habits, I'll have some insights that will lead to some changes.

Thursday, September 2

Cantaloupe and blueberry salad


Ever see a recipe and know that you need to make it as soon as possible, even before all the other recipes that you have already lined up? That's what happened when I saw this cantaloupe and blueberry salad over at Indian Simmer

New melon baller...

The preparation was so simple, but it looked so elegant; I had to make it that night to serve with dinner.  I was so excited, I even bought a melon baller.

Don't hate on our soccer ball bowls!


Cantaloupe and blueberry salad
Adapted from Indian Simmer

I made a few changes to the original recipe, which are reflected here.  Mainly, I nixed the red pepper flakes and toasted almonds; feel free to add those if you'd like.  Next time, I would probably add toasted walnuts or pecans for some crunch.  I only used half of a cantaloupe for the salad, which was more than enough as a side dish split between the two of us.  If you want to make it a main dish for lunch, etc., use an entire melon and double the ingredients. 

Ingredients

  • 1/2 medium size cantaloupe
  • 1/2 cup blueberries
  • 1/4-1/2 tsp salt*
  • 1/2 - 1 tbsp lemon juice*
  • 1 tbsp chopped sweet basil leaves (mint would also be good)

Directions:

Using a melon baller, scoop out bite sized pieces of cantaloupe, reserving the melon shell.  Mix all the ingredients together in a bowl (I let it sit for an hour or so in the fridge to let the flavors meld).  Serve the salad in the reserved melon bowl. 

*Note: If you decrease the lemon like I did, be sure to decrease the salt like I didn't; it will balance the flavors a bit more.
Related Posts Plugin for WordPress, Blogger...