Saturday, May 22

Butternut squash flatbread with pine nuts and parmesan

Ever work yourself up about something so much that you put it off for as long as possible?  And then, when you finally do it, you kick yourself for waiting so long.  That's exactly what happened to me when I made this flatbread.  


I have wanted to make yeasted bread products for a long time, but I had myself convinced that the learning curve was incredibly steep and that it was entirely too hard to do.  I've discussed my fear of yeast before, but I finally decided to conquer it because sooo many commercially made breads (and doughs) out there have some form of soy in them.  (That's a no-no now that we are eliminating it from our diet.)  I've been checking out other blogs and cookbooks trying to figure out which type of bread is a good one to ease into working with yeast.  As far as I've been able to figure out, flatbreads, including pizza and focaccia, are the way to go because they don't require too much fussing with (or at least it seems that way).


This butternut squash flatbread recipe in a recent Real Simple magazine called for store-bought dough, but it was just the nudge that I needed to make my own.  I used Mark Bittman's recipe from How to Cook Everything (see pizza dough recipe and instructions).  Making the dough was a bit time intensive, but not labor intensive and nowhere near as difficult as I thought it would be.  Plus, while I waiting for it to rise, I was able to prep everything that I needed and clean most of the dishes - Can't beat that!  All told, from start to finish, the entire flatbread took me maybe 3 hours, most of which was largely unattended.     


Butternut Squash Flatbread with Pine Nuts and Parmesan
Slightly adapted from Real Simple  
Ingredients:

  • Bittman's basic pizza dough
  • 2 tablespoons olive oil
  • 1 pound butternut squash—peeled, seeded, and sliced 1/4 inch thick (I used a smallish squash, slightly larger than my hand.)
  • 3-4 decently sized shallots, thinly sliced
  • 1/4 cup pine nuts
  • 1 tablespoon fresh rosemary, roughly chopped
  • kosher salt and black pepper
  • handful or so grated Parmesan (Do this to your liking. I found a thin layer was better than a thick layer.)
Directions:

Knead the dough into a ball and place on a lightly floured surface.  Cover with a towel or plastic wrap and let rest for 20 minutes.   Grease an 11x17 in jellyroll pan with 1 tablespoon of the oil.  After the dough has rested, press into a small rectangle on the pan and stretch it a bit.  Keep pressing and stretching until the dough is reaches the edges of the pan.  I didn't have any trouble with this step, but if you do, the key is to take your time and don't fight the dough.  If it resists, let it rest a bit and then begin stretching again.  Cover the dough with plastic wrap or a towel and let it rest (again!) for at least 30 minutes.

Preheat oven to 450° F.  In a large bowl, toss the squash, onion, pine nuts, rosemary, 1 tablespoon of the oil, ½ teaspoon salt, and ¼ teaspoon pepper.   Uncover the dough, dimple with your finger tips or knuckles.  Scatter the onion-squash mixture over the dough and sprinkle with the cheese. Place in the oven and lower temperature to 400° F.  Bake until golden brown and crisp, 25 to 30 minutes.

Thursday, May 20

Nut and Yogurt bread

Breads are a perfect way to get carbs at almost any meal.  The same bread can be used, all you have to do is change the topping; butter, jam, pesto, hummus, etc. can all serve as garnish.  I've been wanting to introduce more breads into my baking repertoire, but I have yet to conquer my irrational fear of yeast.  This recipe seemed like a good start to making 'real' bread.  Technically, it's a quick bread.  It looks and tastes like 'real' bread but there was no yeast involved.


I did run  into a few problems with baking this bread.  First, there were some weird conversions from weight to volume, but a scale would have solved that right quick.  Then, it took a lot longer - almost double the time - to bake than the recipe specified; this could have been because I kept opening the oven door, marveling that there was 'real' bread in my oven.  Next time, I'll keep the door shut! 

Nut and Yogurt Bread

Ingredients:
  • 1.9 cups (250g) all purpose flour
  • 1.8 cups (250 g) whole wheat flour
  • 1 tsp salt
  • 2 tsp baking soda
  • Handful of toasted nuts (I used walnuts)
  • 300ml Greek Yogurt*
  • 125ml Semi Skimmed Milk*
Directions:

Preheat oven to 450.  In a large bowl combine all of the ingredients, mix thoroughly, knead for a few minutes on a floured surface and form into a flattish round ball.  Oil a baking sheet and place the bread on it, making a few slashes in the top. Bake for 25 - 30 mins - it should sound hollow when the base is tapped.

*I chose to go with the milliliter measurements because when I tried to convert them, the values were very wonky - think 1.56cups.  Since I have liquid measuring cups that list both milliliter and cup measurements, it was just easier.  You could do a conversion search to get the exact values, but I encourage you to stick with the milliliters.

Veganizing: I'm sure you could make this vegan by subbing nondairy yogurt or sour cream and 'milk.'  Greek yogurt is fairly thick, so I would imagine nondairy sour cream would be a better substitution, but if you wanted to do a little extra, you could strain your nondairy yogurt.

Monday, May 17

Vegan tortilla 'sandwich' and eliminating foods

When we first decided to tackle Tara's AIP head-on and try to manage it instead of allowing it to control us, the most daunting aspect was revamping her diet.  Aside from the universal mantra of eat a carb-rich diet, there is so much conflicting information about what a Porphyriac can and can't eat. Honestly, it was really overwhelming.  

After some moping around and a lot of, "Oh my goodness, what the hell can you eat, Tara," I realized that being so overwhelmed to the point of paralysis wasn't going to get Tara anywhere.  So, what did I do?  I looked through several websites that had dietary information and picked out some major themes.  I found that the guidelines could be roughly boiled down to this: 

1. Eat a diet that has at least 250-300g of carbs per day.
2. Avoid all soy products.
3. Limit the amount of sulfur/sulfite intake.
4. Avoid alcohol.
5. Eat regularly and don't fast.
6. Avoid chamomile. ( I know, weird.)

UPDATE: For a more detailed restricted foods list, check out the Restricted foods page


The first thing we did was to get Tara to eat more regularly; this isn't something that comes easily to Tara.  She doesn't get hungry to often, so she can't rely on her body to tell her when to eat.  So, we figured that she needs to eat every three hours or so.  Also, she has to eat or drink something very shortly before going to bed and after waking up.  This has made a huge impact on how Tara feels.

As far as eliminating the porphyrinogenic foods, our strategy is to no longer bring it into the house and when we use it up, that's it! (This will save us from having to replace everything in the pantry.)  I decided to start with soy.  I figure that, while it will be the hardest to eliminate, it will also have the most impact.  Soy can be tricky because it comes in several different forms: soy lecithin, soybean oil, vegetable oil, soy flour, soy protein, etc.  I was shocked to learn that it's in almost everything, especially in baked goods.  What's worse, I can't even rely on the allergen information (you know, the "Contains wheat, dairy, etc. ingredients."), because soy is not always listed, so I have to check all of the ingredients.  The biggest problem has been with convenience foods that Tara really likes, such as frozen waffles or breakfast bars.  My goal is to slowly replace those with either other soy-free, convenience-substitutes or homemade versions.  

 Gratuitous shot of rising steam...

We've also started to decrease the amount of high-sulfur foods we eat.  Sulfur is in things like cabbage, broccoli, brussel sprouts, and tomatoes - yeah, tomatoes!  (See somewhat conflicting lists here and here.)  We're not being super strict about eliminating any of these foods yet because it would just be too much.  Thankfully, though, we don't regularly eat foods that are super high in sulfur, like those from the cabbage family, so that hasn't been too difficult.  However, when it comes to things like garlic and onions, foods that are integral to so many other recipes, all we can do is decrease the amount of how much we eat for now.

The hardest thing about this has been being creative and open-minded about what we cook and eat; we have to be willing to try different foods. On the up-side, though, we've eaten so many yummy foods that we never would have tried before, like these vegan tortilla sandwiches.

 I love how the grains of rice look like teeth.

Vegan tortilla sandwich

They say that necessity is the mother of all invention... Of course, it's cliche to say so, but in the case of this tortilla sandwich, it's so true.  I used all of my energy making a from-scratch bread (recipe soon) that I could barely come up with anything for dinner.  So, I started randomly pulling things out from the fridge.  I ended up with an old package of sun-dried tomato tortilla, Moroccan-flavored hummus dip, leftover black bean and tomato rice, and frozen peas.  The combo was de-freaking-licious!  The entire time I was eating the sandwich, I kept saying how insanely good it was.  The only thing I would have changed was to mix the peas in with the rice and included them in the sandwich (I actually did this the next night for dinner).  

Feel free to experiment with what you have.

Ingredients:
  • Tortillas (at least 2)
  • Some sort of dip or spread that isn't too runny
  • A rice and/or chopped vegetable mixture, room temp.
  • Olive oil
Directions:

Heat a pan over med/high heat.  Spread one side of each tortilla with your dip. (You want it to be thick enough to hold your rice/vegetable mixture on the tortilla, but not so much that the mixture gets lost.)  Spread your rice/vegetable mix on one of the tortillas.  Place the second tortilla, dip-side down, on top.  

Brush one tortilla lightly with olive oil.  Put the sandwich, oil-side down, in the pan.  Cook for a few minutes until the bottom is browned to your liking.  Brush the top lightly with olive oil.  Flip and cook until browned.

Cut in quarters to serve.  

Note: Recipe can be halved by using one tortilla, cut in half.

Thursday, May 13

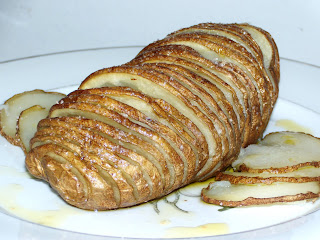
Hasselback Potatoes

For our first post (drum roll, please), we bring you the potato.  Potatoes are an awesome way to get your carbs in because they are so versatile; you can prepare them in a variety of different ways.  Today, we're baking 'em.


I like baked potatoes; I mean, doesn't everybody (save for an Atkins-lovin' carbophobe, of course)?  But, I only like them one way: smothered in butter, sour cream, and, occasionally, cheese.  Now, that's an awesome way to eat them...if I only did it once every so often and wasn't concerned with the effects of all that dairy on my lactose-intolerant GI system.  Now that we are eating a high carb diet, we've been trying to include more potatoes.  No way am I subjecting myself to that fat-smothered potato several times a week; I think my thighs and taste buds would revolt.  So, of course, I've been on the lookout for lower fat ways to prepare potatoes.    

Enter the Hasselback potato.  Even though I've known about this preparation method for a while, I didn't make them immediately.  Why I waited is beyond me, because had I known how amazing these were, I would have made them immediately.  Let me tell you, these aren't your momma's baked potatoes.  Nope.  They are waaaaaaay better.  To wit, since discovering the awesomeness that is the Hasselback potato, we've made them at least twice, and sometimes three times(!), a week.  I often end up eating most of my potato before I leave the kitchen to enjoy my meal.

Thankfully, preparing a Hasselback potato is only slightly more involved then a regular baked potato.  Take a look-see at this "recipe" and you'll find out.

Hasselback Potatoes

Potatoes*
Olive oil
Salt

Put your potato on a spoon.  Then slice it as thinly as you'd like.  The spoon acts as a guard against slicing all the way through the potato.  Depending on the size of your potatoes, you may have to adjust the potato on the spoon and maybe turn it around.   Rub the potato with oil; I use olive oil.  Liberally dust with salt.   Cook at 350-400 for 30 mins or so, depending on how big and/or how many potatoes you're cooking.  Check for doneness by pulling out a slice and tasting it.  Ideally, it will be crispy on the outside and soft on the inside.   I find a light drizzling of truffle oil kicks these up to a whole 'nother level.  
    *Any variety of potato will do, but I find that the russet crisps up nicely. Also try these with the blue potatoes; the earthy flavor is intriguing - in a good way.

    Monday, May 3

    A Vampire's Kitchen and a little info about us


    Hello!  We're Sunshine and Tara and we're so glad you stopped by.  

    About us:
    In a nutshell, Tara's the one with the AIP and Sunshine is the head chef and chief caregiver.  We are, of course, sooooo much more than that. For example, Tara has a burgeoning craft jewelery business (link to come) and coaches a women's softball team; Sunshine is a bellydancer and a science-nerd.

    About our diet:
    Planning our meals is a delicate dance around both of our allergies, intolerances, porphyric triggers, and sensitivities.  Additionally, we're somewhat environmentally conscious and try not to eat too much mass produced animal products.  As such, we eat mostly vegetarian and sometimes vegan; however, we are not strict about it (we're what you might call flexitarians, but we prefer not to put a label on it). We focus on a low-protein, high-carb diet due to the high carb requirements of Porphyria; Sunshine's challenge is to due this creatively - there are only so many potato, pasta, and rice dishes one can eat without getting bored!

    About the blog title:
    The title of this blog is a tongue-in-cheek reference to the supposed notion that Porphyria explains the origin of vampires, due to certain perceived similarites.  Many Porphyriacs, Tara included, are sensitive to the stigma associated with a connection to vampires (and werewolves, too).  However, after much discussion, we decided to go with "The Culinary Vampire" as the title due to its originality.  We try not to take ourselves seriously around here, and the title is a perfect example of that.    

    Thanks again for stopping by and we hope to see you soon!
    Related Posts Plugin for WordPress, Blogger...